Hunter battle tactics
Hunters are one of the most complicated classes to play, while at the same time they can be very easy to understand. The general idea is shooting your enemies from afar, but if you don't do this often, you're putting yourself at a disadvantage. This impact can be felt across many of the Hunter's skills. On the contrary, knowing how to play a Hunter sets you up for powerful amounts of damage, while also being a glass cannon.
In PvP, the idea is no different from PvE. Players will always try to get close to you to minimize the damage taken from you, just as how monsters will always get close to you for some powerful skills. But taking up key positions, and finding the right amount of distance and movement speed to get away from your enemies each time will help you in the long run. This guide will help you strike a balance in that.
Contents
The Mathematical World of Range
The first thing you want to do is to get a sense of the range, theoretically. From the page Meter, one meter is 50 pixels in-game. Four meters (200 pixels) is the typical distance to cast spells, but it is also the range that Hunters can target an enemy at.
The passive skill, Sniping increases this range slightly (by 9%) each time you put a skill point into it.
- Level 1 (requires level 8) is about 4.36 meters (218 pixels)
- Level 2 (requires level 16) is about 4.72 meters (236 pixels)
- Level 3 (requires level 24) is about 5.08 meters (254 pixels)
- Level 4 (requires level 32) is about 5.44 meters (272 pixels)
- Level 5 (requires level 40) is about 5.8 meters (290 pixels)
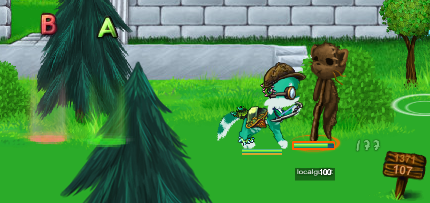
How much does it apply practically? Not much. In the horizontal picture, the A position marks the 4 meter range of a Hunter without Sniping, while the B position marks the 5.8 meter range of a Hunter with Sniping (maxed at level 5). The position that the player is at is the range under 1.2 meters. When you go a bit beyond the range that you are capable of firing at, the auto-move kicks in and moves you a bit toward the enemy.
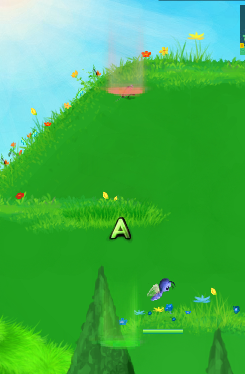
Meanwhile, when we observe the vertical picture, the positions from A to B mark the maximum vertical range of a Hunter with Sniping (this is about the same distance as three-four jumps). Being able to reach your targets that far is one of the Hunter's greatest strengths.
Effective at Long Range, Poor at Close Range
You might be wondering, if Hunters have their own attack, does that make them a physical class or a ranged class? Although there's no such thing as ranged defense, Hunters are treated as physical class that can operate at range, which means that physical defense applies here in the calculation. That being said, carrying both a bow and gloves adds more weight, thus Hunters take longer to perform one melee swing over a Warrior.
More specifically, the average time it takes to do a melee swing is 1 second barehanded, 1.25 seconds as long as a main hand glove or bow is equipped (but not both), and 1.66 seconds if both a main hand glove and bow is equipped. To verify this, take the average of both your minimum and maximum attack (min+max / 2), then divide it by one of these numbers above. You should get a number close to, or equivalent to your average dps.
Most of the Hunter's skills have a penalty based on distance, and in one special case, platforming. This is the half-damage rule, where a close-range shot (less than 1.2 metres between the player and the targeted enemy) deals half of it's damage. Hunters can alternate between ranged auto-attack shots and melee swings depending on their range (less than 1.2 meters results in a melee swing, more than 1.2 meters results in a ranged shot).
Piercing Shot has a slightly different version of the half-damage rule. It deals half of it's damage against all targets if your closest (first) target is less than 1.2 metres away from you. However, you must be on a straight platform, or else the skill fails to activate. The only ranged skill that ignores the half-damage rule is Arrow Shower, as it is used against multiple targets.
The Enemy of Hunters: Stacking
Because Hunters were intended to deal damage at a range, there lies a huge problem when facing a boss that demands the use of stacking. You might think, if that's the case, then why don't the damage dealers stack together at range? Then you'd be ignoring the warrior damage dealers that have to attack at close range. If you think the opposite, Hunters are slapped in the face that tells them that they'll do 50% less damage at close range.
You can think of a few reasons why this dilemma would affect Mages and Priests as well. Stacking together while far away from your enemy doesn't synergize well with water mages, whose mana regeneration and damage is based mostly on Mist of Ice/Intense Cold. To damage your enemy and gain mana faster into your mana crystal means you have to be standing directly on the enemy, and to go ranged is choosing one but neglecting the other. For Priests, Healing Winds may not reach the Hunter that's standing far away from the rest of your group, nor is Healing Springs.
For this reason, Hunters must stack when it truly counts, and not stack when it doesn't.
Knowing When and Where to Stack
Because the playstyle varies depending on the boss you encounter, here is a list of some of the cases:
- Most Boss Fights: If the boss doesn't require you to stack, then don't stack. Keep yourself at range. If your health is running low, and the healer plans on using Healing Springs, move toward the springs, then return back to a distance.
- Lucy and Sian (Hard Mode): In Battle for Ashaya, you have to split up into two teams, one stacking on Sian, the other stacking on Lucy. The Hunter must target the other boss (if they were on Sian, they must target Lucy, vice versa).
- Ichas: In the Ichas' Ire trial, you have to time when the frost bombs drop and stack on the later one first, before stacking on the early spot. Make sure that you are stacking during this point, and unstack during other points in the fight to maximize damage.
- Shade of Aeris: In the Cursed Farm, you have to stack among your teammates to reduce the damage taken from Lightning. The more players that are stacked, the lesser the damage taken. The Hunter must stay at medium range, to ensure that they are dealing full damage, and avoid Lightning Chain (deals more damage the further your allies are spread out from each other) from dealing additional damage.
- Axrahn Bladeclaw: In the Crystal Crypt, you have to watch out for Axrahn's Pounce, that can potentially one-hit KO the targeted player unless players stack to reduce the damage taken. Rush to the targeted player, but in other parts of the fight, stacking isn't necessary.
- Elder Patrizya: In the Crystal Crypt, Patrizya takes up a large portion of the platform that you're standing on. In HM specifically, if you stay too close to the edges, a single Stomp can cause you to fall off (let alone Patrizya's three stomp attack pattern at less than 20% of their health). Try to keep yourself in a middle position between Patrizya and the left edge of the platform.
- Sporebark Watcher (Solo): In the Cultist Prison, you have to stack among the green mushrooms for healing, while avoiding the purple mushrooms, and kite at the same time. This may not be possible, as a friend might be required.
- Rochiear (Solo): In the Slit Cave, soloing is even more challenging, as not only do you have to kite to maximize damage, but watch out for Rochiear's charge. However with the right timing, it is possible to finish him off.
- Daphne: In the Blackwood Depths, you have to watch out for Daphne's Arcane Explosion, which does the same effect as a Pounce. Stack only to reduce the damage taken, and return to fighting at a distance.
- Zafyre: In the Blackwood Depths, you have to walk with your group while stacking to avoid pounce and the plants that come out of the ground. In HM, the field is more limited, thus you have no choice but to stack with your group as much as you can, and unstack whenever possible.


