Map Editing Tutorial
If you've read the forum thread(s) and page on Map Editing, it might seem vague and confusing. This tutorial (with images) will help first-time players get used to the map editor. In addition, an example will be demonstrated on a step-by-step basis.
Contents
- 1 General Information
- 2 Navigating through the Dashboard
- 3 Navigating through the Map Editor
- 4 Visiting the Custom Map
- 5 Limitations, Delays and Best Practices
- 6 Summary
General Information
The map editor can be used to create custom maps in Paw'D. Custom maps are private by default, and can only be seen by others if you share your map code with them. You must file a ticket through '/support' before you can gain access to the map editor.
Once you've gained access to the map editor, the dashboard and the map editor itself become available. Please note that some of the links and features on the dashboard are broken, so use the alternative map editor link at 'elyssia.pawdgame.com:4901/leveleditor/', not 'pawdgame.com/create/pawd/editor/'.
The dashboard stores your custom maps in a convenient list, showing basic information and statistic data about how many times it was viewed and when the map was last accessed. Under Custom Graphic, you can add your own graphics using Add, and manage them under List. You can also add a new custom map using Add New, however this link is broken.
Under Manage, it offers the same basic information as well as additional settings. These settings include:
- Option to enable PvP (player vs player) and/or GvG (guild vs guild) for the map
- The custom map's code under Code (Link and Download Game Client are broken)
- Enabling/disabling guest access to the custom map (can get the permanent version of the map code here)
- Delete the custom map (it won't be deleted immediately, have to wait several hours), and edit the custom map (this link is also broken)
Uploading and Adding Custom Graphics (workaround included)
Avoid using the dashboard to upload custom graphics, as it corrupts the image. Upload the graphic through the backend instead. Please note that custom graphics are currently unstable as they may fail to load correctly, or cause the mini-map for your custom map to break.
Log into the backend site first using your Paw'D credentials. You should be redirected to a site called Chawrs Backend. Click on Add Graphics (located on the top-right of the page). Select Custom from the dropdown list for Class, choose the name you want to give the graphic, and select the actual graphic that you want to upload. Then click on Save Changes to commence the upload. This should appear as a list on the same page. You can select the image, and see that it has been properly uploaded.
To add a custom graphic into your custom map, load the custom map in the map editor and go to the graphic library. It should be in a new category called Custom (or a name close to that). Then, normally add the graphic into your map and save your map. You should now see it appear in your custom map.
Currently, the only allowed custom graphic file types are gifs/png/jpeg/jpg/etc. Custom music isn't allowed.
Creating your First Map
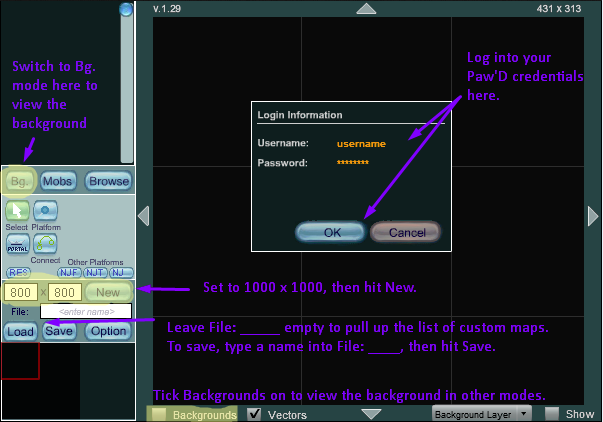
When you first start up the map editor, you'll be taken to this screen below. Log in using your Paw'D credentials.
On the bottom-left of the screen, select the map size you want (length [left to right] and width [top to bottom] in pixels). By default, the size is set to 800 x 800. Change the map's size from 800 x 800 to 1000 x 1000. Then press New. Then press the button called Bg (to show that the map has been created with the default background). You have created your first map. If you make any mistakes, you can click New again to reset the whole map without refreshing (it won't be uploaded to the server until you save it).
Don't forget that since the chatbox takes up 200 pixels of space, you want to build your graphics so that your platforms are 200 pixels higher.
If you've created several custom maps and want to return to this map later, the dashboard only redirects you to a broken link of the map editor. Instead, erase the file's text box so that it is blank, then use Load to bring up a list of custom maps. This way, you can access your other custom maps.
If you saved your map already, and want to know how to change the size of the custom map, see the section called Expanding/Shrinking your Map Size below.
Background Layers and Scrolling
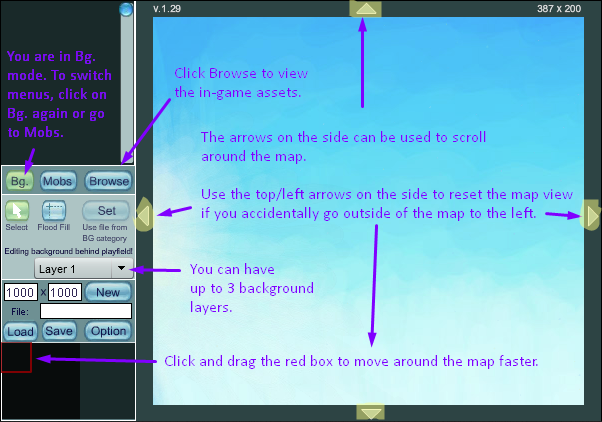
The game automatically adds a background for you once you have created a new custom map. This background is a sky that changes depending on in-game time. To show/hide the background, tick the checkbox beside Background (doesn't affect the custom map in-game). For this tutorial, all checkboxes have been ticked.
Notice that the button for Bg (background) is highlighted in green. This means that the menu is in background mode. To exit the background mode, simply click on the Bg button to turn it blue. You can switch to monster mode by clicking on the Mobs button, and exit from it by simply clicking the button again. When both buttons are blue, that means you are in Normal mode.
If you want to change the brightness of the background, you can go to Options beside the Save button, tick the box beside Dim Background, and set the % to whatever we want it to be. This will apply globally.
Setting a Different Background
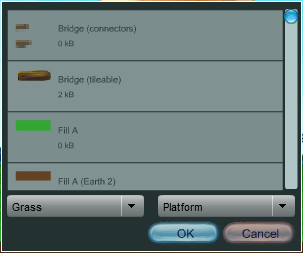
If you want a different background other than the sky, switch to background mode, and click Browse. Use the dropdown list to select a type of terrain, and the other dropdown list as Background. Click on the background you want, then press Ok. The background is now added to your Quick List.
To set the different background, click on Set. This way, the game will automatically set the background to the screen, so you don't have to worry about where it is positioned. If it is not showing, exit out of background mode to see the reflected changes.
The editor also allows you to flood fill a background onto a certain area of the map, although it doesn't seem to work as intended. Only one background can be used for each layer. If you want to combine backgrounds (to a max of 3), the game doesn't have many default backgrounds that can be combined together (you'll only see Layer 2 or 3 depending on the number of backgrounds you want to set). Select Layer 1 (this is the back-most layer), choose the background, then set it. Then, select Layer 2, choose the background, then set it, and vice versa.
Scrolling Around
To scroll around, use the arrows on the edges of the map, or click and hold to drag the red box on the mini-map (located at the bottom-left of the map editor). You'll notice that the background appears to be small or cut off by a small portion at the bottom. This is fine, as the map will automatically resize the background when you actually go to it. In background mode, the background looks smaller, while in Normal mode, the background looks bigger.
The top-right of the map editor shows your current position with your cursor. The position (0, 0) starts from the top-left and increases the further down and right you go.
If you accidentally went outside the map to the left by clicking and holding the red box on the mini-map, you can reset the map view by clicking on the left/top arrows on the edges of the map.
List of Controls
The map editor is known to have some inconveniences for the user. If you are trying to type something into a box or move something around, it might not work. Click on a text box somewhere on your browser (such as the search bar), then click somewhere inside the map editor to bring it to focus. Then it should work (if not, click somewhere else on your browser and onto the map editor again).
These controls only work when you're about to set the graphics down, not when they have been already placed. When you change the size, it'll stay that way for every graphic you put down, whereas you have to manually mirror for each object. Click the Select button on the menu or Escape key to unselect a graphic. Note that when you enlargen objects, it'll become pixelated and lose quality (can even be done for some monsters).
- M to mirror the graphic horizontally (you can mirror monsters before/after they have been set)
- + to increase the size of the graphic (use the 'Q' key if the plus key doesn't work)
- - to decrease the size of the graphic (the minus key doesn't work on some keyboards, instead use the 'A' key.)
- * to reset the graphic back to it's original size.
These controls are focused on repositioning the graphic object (while they are selected/highlighted) after already setting them down. You can move the object by a pixel in the direction you want using the arrow keys. You cannot mirror or change their size after they have been set.
- Page Up to bring the object one layer forward (towards the front)
- Page Down to bring the object one layer backward (towards the back)
- Home to bring the object all the way to the front (front-most layer)
- End to bring the object all the way to the back (back-most layer)
- Delete to delete the object.
When a platform (shown as a blue line with circles) is selected, you can move around the circle (referred to as nodes) using the arrow keys. When selecting the platform again, you are selecting the last node by default. You can only create platforms that go from left to right, not right to left (the server will give you an error when you try to save the map).
- Page Up to move to the next node (towards the right)
- Page Down to move to the previous node (towards the left)
- Backspace to delete the selected node.
- Delete to delete the platform.
For functional objects such as jump hints, portals, and respawn points (you can only set one respawn point), you can only move them around by pixel-precise movement using the arrow keys. Monsters can be moved using the arrow keys and mirrored using the M key after they have been set.
In addition, there are three properties that you can access: Portal Properties (portals), Monster Properties (monsters), and Sound Properties (sound object). To access them (using your mouse), you would right-click the monster/portal/sound object (while in focus). For monster properties, make sure that the monster is unselected before right-clicking on them. Alternatively, you can also manually select them, then use the Enter key to access their properties.
Adding Graphics from the Graphic Library
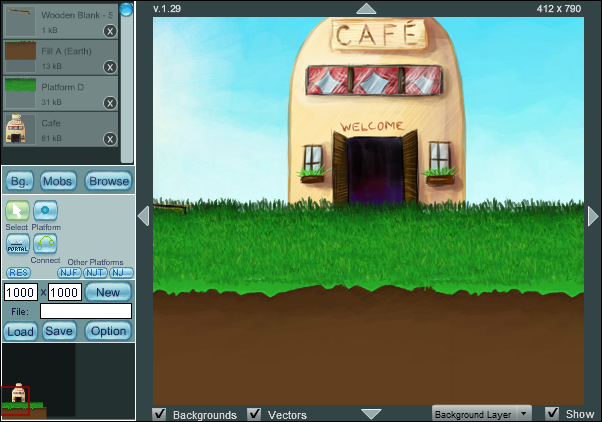
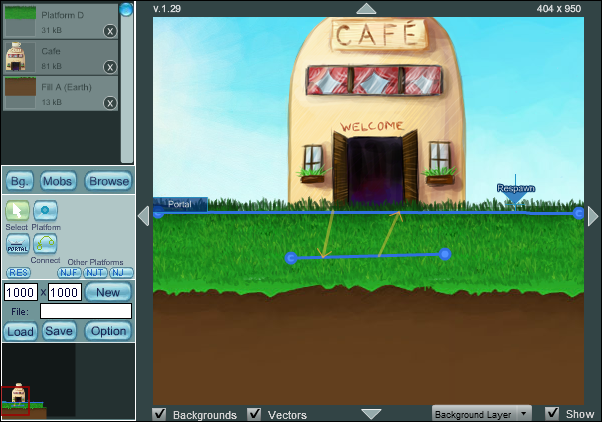
Next, we want to add graphics into our map. Parts of the landscape, such as dirt, grass and trees are needed. Remember that your graphics should be placed in a way so that when platforms are placed, the platforms are 200 pixels above (in order to get the platform directly above the chat box, which takes up roughly 200 pixels itself). For instance, if your map was 1000 x 1000, you want to make sure that your grass is placed between 750 and 800 (for rocky/snow maps with slopes leading upwards, you can place them way higher). I used an object to show where the 750 pixel mark was on the map.
To add a graphic, switch to Normal mode by exiting out of either Background or Monster mode (Background mode also works, but it is easier to work in Normal mode). Click on Browse, then use the dropdown list to select the terrain you want, and go for platforms (sometimes scenery). Choose the graphic you want, then paste it onto the area you want the graphic to be on.
The graphic will also be added to the Quick List on the top-left of the editor, allowing you to re-select it again. You can remove graphics from the Quick List by clicking the x associated with the graphic. The Quick List will be wiped once you leave the map editor or refresh the page.
There are 19 different Categories that you can select from, such as: Grass, Beach, Cafe, Cave, Cave2, Class, Earth, Factory, Garden, Jungle, LargeTree, Monastery, OneTimeAssets, Ruins, Snow, Spaceship, Temple and Treehouse.
There are four kinds of graphic objects, such as: Background, Platform, Scenery and Sounds. Not every Area has all four of these types.
Correcting the Positions and Layers
To correct the position of the graphic object after setting it down, select it, then tap the arrow keys to move the graphic pixel by pixel in the direction you want. You can hold the arrow key to speed up the pixel-precise movement, but it is still rather slow (so be patient!). You cannot mirror the object or change it's size after you place it on the map, so remember to do it beforehand.
You will notice that the graphics don't work well with each other, and may look cut off. In order to deal with that, reposition the layers by using the Page Down and Page Up keys. In the example image provided, I used 2 Fill A (Earth) and 3 Platform D's from the graphic library under Grass - Platform, 1 Cafe from the category Grass - Scenery, and 1 Wooden Blank - Separator from the category Beach - Scenery to show the 750 pixel mark.
You can partially overlap two of the same graphics together so that they can fit, and reposition the layer that the graphic is on using the Page Down and Page Up keys. However, some graphics won't allow you to do that by the nature of their design (may still look cut off). If the graphics are too big, shrink the size of the graphic before setting it down. If you cannot shrink it, you can put graphics that sit between the borders of your custom map, to fit your needs. The server will automatically cut off parts of the graphic that sit on the outside of the borders once in-game.
The Three Layers
On the bottom-right, you can select between three layers: Background, Platform and Foreground.
The Background layer is where you'll work on most of the time when adding just about anything in the map editor. It is selected by default.
The Platform layer is located between the background and the foreground, focusing on the platforms themselves. If you have too many graphics and platforms in your custom map, you are bound to run into situations where your character cuts through the foreground graphic on the wrong platform. This layer is used to fix that issue, and is later explained in the section Finding the Middle Ground in Platform Layers.
The Foreground is the layer in the front. If you want to bring a graphic object directly to the front without having to use the Pg Down and Pg Up keys all the time, you would switch to the foreground layer, select the graphic and paste it to wherever you want. This will dim all objects that are in the back.
You can move graphic objects between these three layers. The map editor has this weird rule where you need a nearby graphic object that is in another layer in order for you to make the switch. For example, if I wanted to move my existing stick object from the Background layer to the Platform layer, I need to temporarily place a rock nearby in the Platform layer. Then I'd select my stick again and press Page Up several times in order to make the switch. You can confirm this by seeing how the object is no longer grayed out when you're viewing the Platform layer (show has to be ticked on).
Changing the Color of Graphics
The game uses a color code style called Hue, Brightness and Desaturation. This is similar to HSV (Hue, Saturation and Value) for colors, not the RGB model. To change the color of a graphic object, select it, then click on the values beside Hue, Bri and Des. You may need to click on a browser's text field first for the values to be registered. You also may want to look at basic color theory, and the color wheel to help you out.
- Hue represents the type of color (e.g. red, green, blue...)
- The max range for hue is between -360 to 360.
- A hue of 0 (includes 360 and -360), and a desaturation of 0 causes the graphic to resort to the default colors.
- Brightness represents how light or dark the color is.
- A value of 0 is for default, while 100 is for bleached. -100 is for shadowing.
- 101 to 1000 causes the graphic's color to change from somewhere between intense brightness to pure white.
- -101 to 1000 causes the graphic color to change from somewhere between intense shadowing to pure black.
- Desaturation represents how faded or pure the color is.
- A value between -100 to 100 uses the grayscale of the original color.
- 101 to 1000 is for when the graphic's color is more stubborn to change.
- -100 to -1000 does the same thing, but uses the complementary (on the opposite side of the color wheel) of the other color. This may not necessarily be a direct opposite, but a close opposite of the color. Examples include green and purple, blue and orange, etc.
- Going into the extremes such as 10000, or 100000 will cause the graphic to literally become pure of that chosen color.
Don't worry about the Advanced button. This is for questing/scripting purposes only. The Default button is used to reset the graphic object's colors back to normal.
Note that the color of some graphics cannot change due to the way they have been designed. Some graphics may change their colors differently from what you expected it to be (even if you found the HSV values for the color turquoise and put them into the editor).
Adding Sounds & Sound Properties
Without sounds, a custom map does not have any feel to it. To add sounds, select Normal mode or Background mode > Browse, and choose one of the categories with Sounds in it. Then choose whatever you feel best suits your custom map.
Once you select a sound, it will appear as a speaker. The speaker is an invisible object that projects the music into the map. More specifically, the range you can hear the sound seems to be a vertical rectangle (covers a vast distance from up to down, but not so much from left to right).The closer your character is to the speaker, the louder the sounds are. You can mix and match different sounds in a custom map, however it may become distorted and choppy depending on whatever you choose.
For best results, spread out your speakers so that they cover the entire custom map. Do not add too many speakers, and do not add too few speakers (you'll have dead spots in your custom map where there is no music playing).
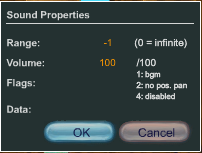
However, what if you want to choose how loud your sound is to begin with? If you want your sound to reach the entire map instead of being a speaker, you want to access the options of that sound. Right-click the speaker object, then click Sound Properties to get into a window like this.
The Range text box indicates how far your speaker can reach. By default, the range is set to -1, but it is recommended that you don't mess with the range any further than what is given. If you want your sound to reach the entire map, just set it to 0.
The Volume text box indicates how loud your music is. By default, the volume is set to 100 out of 100 (at the max), and it makes sense when we already have full volume on our own volume settings in-game, and the system volume on our computer/laptop. If you want to mash sounds together, you can tinker this setting to make louder music softer and softer music louder.
The Flags text box is blank by default and have three options, being 1 (bgm), 2 (no pos, pan), and 4 (disabled). If you have no clue what it means, you probably shouldn't mess with it.
The Data text box is only used for controlling when specific sound effects play in-game, such as Birds 1, Birds 2 and Westminster Quarters. It plays based on the in-game time, and has no effect on other sounds. The text box accepts an hour range (based on the 24 hour time format [22:00]) in the shortened form (e.g. 3-7, 9, 13-15, 18). This is translated in order to: 3 AM to 7:59 AM, 9 AM to 9:59 AM, 1 PM to 3:59 PM, 6 PM to 6:59 PM.
- Whenever you're declaring a range like 4-6, always add :59 to the end of the range so it becomes 4 to 6:59. Whenever you declare a single number like 5, think of it like a range from 00 to 59 so it becomes 5 to 5:59. Since both use the 24 hour format instead of 12, they are in the AM.
Platforms, Jump Hints, Portals and Respawn Points
You may now have graphics in your custom map, but if there are no platforms, then you can't actually explore it in-game (you'll just fall to your doom).
In Normal mode, select the Platform button (this will be highlighted in green). Then, click somewhere around the 800 mark indicator, on the left side of the map. This will create a node. Then click on the right side of the map, while following along the 800 mark indicator. This will create a second node, and a blue line is drawn from the first to the second. These blue lines are where your character stands on (adding more than 2 nodes makes the platform complex). In other words, these are platforms (also called vectors).
You cannot place your nodes on the right, and work your way left. Instead, you have to start from the left, and work your way right when placing platforms. Click on the select button to cut off the platform instead of adding more nodes to it.
Use the arrow keys to move the node (will start from the most-recent node first) after they have been set if you need to adjust them. Use the Page Down and Page Up keys to switch between nodes.
The Properties of Platforms
Once you got the hang of placing down platforms, you might be wondering what the buttons NJF, NJT and NJ do. They are all shortcuts for creating platforms with different jump conditions. In all three cases, you can fall as long as there is a platform underneath (if there isn't, the fall won't work).
- No Jump From: You can't jump to any other platform. For example, if you were on Platform A (set to NJF), you can't jump to Platform B (normal), but you can still jump on Platform A itself.
- No Jump To: You can't jump to this platform. For example, if you were on Platform B (normal), you can't jump to Platform A (set to NJT), but you can still fall if there was a platform underneath it (if there is no platform underneath, the jump won't work).
- No Jump: You can't jump on this platform at all. This is a combination of both No Jump From and No Jump To.
You might be wondering, is that all there is to platforms? No! In fact, if you go ahead and select a platform you've placed down, you'll find the Advanced button. There is also a checkbox for in BG, which means In Background, but we don't worry about that when creating maps, until we want to make platforms that tell whether they are behind or in front of graphics. But this is not important now.
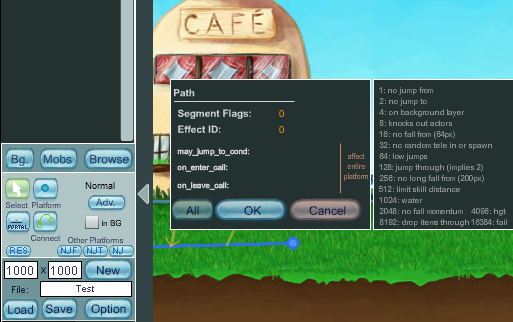
When we go ahead and click the Advanced button, you'll get a screen similar to this one. Don't worry about the Effect ID text boxes, as well as the May Jump To Condition, On Enter Call and On Leave Call. These are used for scripting/questing.
Instead, you want to pay attention to the Segment Flags, and the big list with small text on the right. Each of these in the list are called segment flags, however I'll call them conditions to make it clearer. Each number is associated with a condition; something that happens on the platform. You can click on one of the conditions in the list to add it to your platform. You can combine conditions; these will be added as a sum under Segment Flags (1 [no jump from] + 2 [no jump to] = 3 [no jump]). You can test these conditions yourself to see what happens. After selecting the ones you want, pressing All will save that condition to the entire platform.
If you want only part of your platform to have a specific condition, you would first select the node you want it's condition changed. Choose the conditions you want, then press Ok to save that condition to the node. This covers only the selected node and the previous line (up to the previous node). The map editor will represent this condition on the platform visually as well with a different color, or thicker/thinner line.
For example, if I wanted to stop someone from jumping from the right side of platform A onto platform B, I would make a platform called Platform A with three nodes in it. Then I would set the one node on the right to have the condition No Jump From. That way, they can't jump from the right side of Platform A. Remember that you start from the most recent node when selecting platforms.
o-----o--o (set condition on third o by pressing Ok this time, not All. This way, --o covers part of the platform / o-----o is still treated as a normal platform)
Jumping Down? So Does the AI
You can now create platforms, but what if you want your character to jump down? Your character is not smart enough to realize this. What if you want to hop to another platform when it might be slightly out of reach? How about telling the monster AI to know where they can jump? In all of these cases, you need jump hints.
To create jump hints, you need at least 2 or more platforms. Go to Normal mode and select the Connect button. Select a platform that you want to jump from (we'll call this Platform A, and assume that it's at the top). This will turn the Connect button pink. Then, select a platform that you want to jump to (we'll call this Platform B, and assume that it's at the bottom). This will draw a yellow arrow to connect the two platforms. This will enable you to jump down from Platform A to Platform B.
Normally, your character already knows how to jump up from Platform B (bottom) to Platform A (top), so we don't need a second jump hint. But if the platform is too high for your character to jump onto, we'll need the extra jump hint for them to do so. The AI is not smart enough to know how to jump upwards and downwards too, so we'll need both jump hints (A->B and A<-B). At most, you should only have 2 jump hints between 2 platforms (usually, any more is excessive except in certain cases).
When selecting a jump hint, you'll see two different checkboxes. When No AJ is ticked, this means that only monsters know how to use the jump hint. Teleport means that the character will immediately warp to the other platform instead of jumping to it.
Note that once you save the custom map, sometimes the jump hints are not saved by the server, or marked as red (jump hint does not work/has errors). One reason this might happen is because you accidentally moved the platform, causing the jump hint to fail. To solve this issue, delete any red jump hints and re-add them to the platforms again.
Portals and Properties
If you want to connect your custom maps together, you need to create and configure portals. Portals cannot be placed outside of the map (the server will give you an error when trying to save it).
To create a portal, go to Normal mode and select the Portal button. Place it somewhere along your platform (a few pixels above the platform, or else you will fall off).
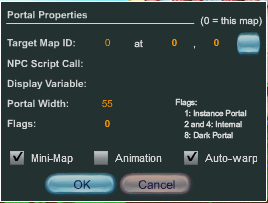
To configure the portal, select it, right-click it and select Portal Properties. You'll be directed to this screen.
We don't care about the NPC Script Call and Display Variable, and it is not necessary to edit the portal's width (unless you wanted to make the portal bigger or smaller) and flags (this just changes the color/look of the portal). Instead, we want to look at the Target Map ID and the three checkboxes below.
When you click on the button next to the Target Map ID, it brings up a list of custom maps you've created. Let's assume that we've created a custom map called Test2, and had a platform placed at the [0, 500] to [500, 500] mark. We want to select Test2 from this list to automatically get the ID, and manually set the position to [250, 500] (so that the portal is in the middle of the map). This way, the portal goes to Test2, under those coordinates. If we leave it this way, it's called a one-way portal.
When selecting the custom map from the list, the mini-map for that custom map appears. You can click on a specific part of the mini-map to automatically set the coordinates, though this is not recommended (the mini-map is too small, so it's hard to see where the platforms will be). You might accidentally set the position to somewhere where you'll fall off.
If we want to make a two-way portal, we have to first save this custom map called Test, then load the other custom map called Test2. Then, create a portal and get to the configuration screen. We have to remember the coordinates of where we set the platform on Test (let's say it was from [0, 300] to [240, 300]). Let's set it to [120, 300]. This way, the two maps are connected. We do not have to be exact with the coordinates; it is still safe to put the coordinates a couple of pixels above the platform.
When the Mini-Map checkbox is ticked, you'll see the portal as a yellow square on the mini-map, otherwise it won't be seen on the mini-map. If you want the portal to be animated, tick the checkbox next to Animation. If you want the portal to immediately take you to the next area, tick the checkbox next to Auto-Warp (if left unchecked, the player has to manually press the jump key themselves to go in the portal).
Respawn Points
The respawn point tells you where your character should be revived at once they are knocked out, and where they will directly spawn to once they enter the custom map (through a code).
To set a respawn point, go to Normal mode and click on the Res button. Then set it anywhere you want it to be (preferably somewhere on a platform). You cannot have more than one respawn point (once you try setting down a second respawn point, the first one disappears).
Adding Monsters from the Monster Library
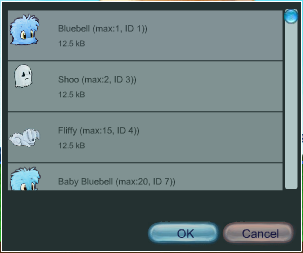
What good is a custom map if there isn't any monsters in it? We'll begin by clicking on Monster mode, and then clicking the Browse button. You'll come to a screen like this. Note that you can't see jump hints while you are in Monster mode.
Notice that as you scroll down the list, each monster is assigned an ID, and a maximum number of spawns. This means that you are limited to having a certain amount for each monster in your custom map. Not every monster from the game is included in this list. The ID represents their number in the Monster Compendium.
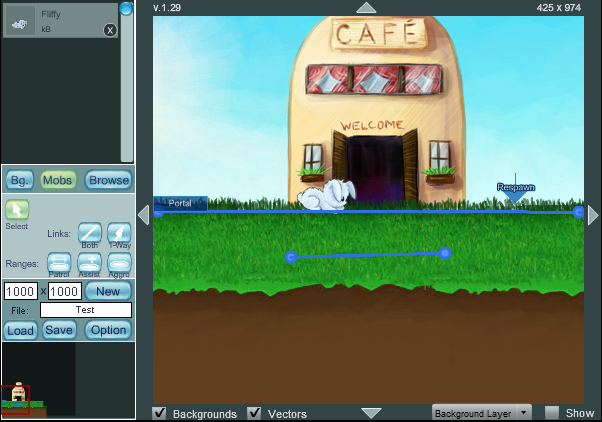
Let's choose a Fliffy, and spawn it somewhere on the platform. Before setting it down, it will show the monster's range and set line.
We have placed our very first monster onto our custom map, but it won't move on it's own unless we attack it. In order to make the monster move, we need to set a Patrol.
Click on the Patrol button, and then select the monster. When you move your cursor, you'll see a blue line extending from the left and right sides of the monster. Extend the blue line as much as you want, then left-click to set it. This line will tell the monster how far they can move on their own.
Tinkering with the Monster's Properties
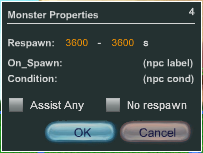
Right-click the monster to see it's properties (if you cannot get to the properties, move your monster into an area with fewer graphics and try again). You'll come to a screen like this.
The 4 represents the monster's ID (for Fliffy). The Map Editor doesn't allow you to set a monster that is not permitted within it's limits (e.g. If you tried to summon Zafyre, the server will not let you save the custom map because it doesn't allow it).
You can change the monster's respawn time (by default, it is 1 hour or 3600 seconds). The reason why it is given in a range is so that monsters spawn randomly within those times (they don't spawn all at once). You can also tick the No Respawn checkbox so that the monster can't respawn.
In the On Respawn text box, you can modify a monster to become Friendly, Neutral or Hostile by typing in monster:patrol (hostile), monster:nonhostile (neutral) or monster:friendly (friendly). An alternative to the No Respawn checkbox is to type in monster:noreset. Some monsters are already hostile, neutral or friendly by default. The Map Editor usually decides this on it's own.
You can tick the Assist Any checkbox so that when a fellow monster is attacked within it's assist range, the monster will always come to it's aid.
Aggro and Assist Ranges
The aggro range (indicated by a yellow circle around the monster) tells you how far away the monster will be triggered if you step into their circle. By default, monsters have a medium radius set around them. To change the radius or reduce it to almost nothing, click on the Aggro button and then click on the monster. Move your cursor to expand or shrink the circle around the monster, then left-click to set it.
To check the monster's aggro range (indicated by a red circle around the monster), click on the Select button and click on the monster. This only matters for hostile monsters, not neutral monsters.
The assist range (indicated by a green circle around the monster) tells you how far away the enemy will care about a fellow monster being attacked. By default, monsters have a medium radius set around them. To change the radius or reduce it to almost nothing, click on the Assist button and then click on the monster. Move your cursor to expand or shrink the circle around the monster, then left-click to set it.
The assist range only matters for monsters whose Assist Any checkboxes have been ticked in their properties, or those who have been linked together. If the assist range is too small, the links may not work properly.
Note that if you cannot get the monster to change their aggro range, they are likely in a crowded spot. Temporarily space them out, and try again. You know when the change is successful when the red circle is not the same size it was before. Otherwise, when you finish setting the circle on the monster, don't click on the Select button. Instead, click on another object to select it.
Both and One-Way Links
Both and One-Way links are used to create enemy groups. By creating a set of links between monsters, you can literally pull the entire map of enemies (not recommended) towards the player.
- Let's assume that there are two monsters, called Monster A and Monster B. Monster A and Monster B are linked together (two-way <--->). If you attack either one or either one attacks you, the other will come to help them.
- To set a two-way link, click on the Both button, then select two monsters that you want linked together.
- Now let's say that Monster A is linked (one-way ->) to Monster B instead. If you attack Monster A or Monster A attacks you, Monster B won't help out. However, if you attack Monster B or Monster B attacks you, Monster A will help out.
- To set a one-way link, click on the One-Way button, select the monster that you want it to link from, then select the monster that you want it to be linked to.
Final Revisions and Other Techniques
Finally, we want to take care of a few things, such as giving the map a name and a realm to exist in.
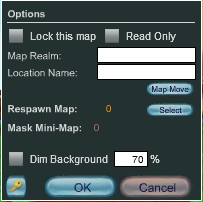
Under Options, you have a couple of other features. These include dimming the background, locking the map (when turned on, prevents players from accessing the map) and making the custom map read-only (when turned on, prevents from changing and saving to the map by accident). If you want to check your login information again and change it, click on the button with a key on it. Hit OK once you are done.
The Location Name is where you actually give your map a title. For instance, if you made a village with lots of grass in it, you can call it Grassy Village. Two or more maps can have the same location name, but not the file name.
The name of the Map Realm is not important, as you can give it anything you wish. The name of the Map Realm is only shown during the first few seconds you enter into a map (but by default I like to leave it as Ashaya). The realm is like a zone or region name, to distinguish between Saliko and the Kingdom of Elyssia's (nicknamed as Ashaya for the village in KoE; also the name of the server) maps for instance.
Once you are done with your custom map and you still haven't saved it at this point (recommended that you constantly save your work, as there is no auto-save), you want to enter a name for it before saving it in the text box beside File. This is the actual name of the file that gets uploaded to the servers, not the name of the map that you see in-game.
Expanding/Shrinking your Map Size
Oh no! I accidentally made my map too small! Can I change the size of my map? Will the graphics be affected?
To change the size of your custom map, you have to first load up the custom map you want it's size to be changed. Then in the width and height boxes, change the number to the one you want. Then hit Save, and then Load the map again.
For best practices, you probably want to start out with a medium sized custom map (1000x1000), and expand somewhere from 200 to 500 each time as you see fit (change either the width or the height one at a time, not both).
- If you wanted to increase the size of the map, you should see your extra space expand out towards the bottom of the map, or towards the right.
- If you shrank the size of the map, then your extra space should shrink from the right side and the bottom first. Some of your graphics may be still outside of the map (to access outside the map, click and hold the red box on the mini-map), and it may not work if a portal is in the way. Move the portal first (to where you know it will be still inside the map), then try again.
When changing the size of the map, the custom map makes sure that all of the graphics stay in the same place as they were. They might look like they are in a slightly different area, but they are not (e.g. A wooden plank placed at 1000x500 will stay at 1000x500). You could leave the same graphics outside of the map, and it would still be there (but it wouldn't show up in-game, since the game cuts everything off that is outside the map.
Offsetting Graphics with Map Move
I expanded my custom map so it would be bigger, but now all of my graphics in the custom map are too much to the top-left. Is there an easier way to move everything so I don't have to manually move them one by one?
There is only one method available. However, it moves EVERYTHING (with the exception of the background), not a group of graphics.
Since your graphics don't move, sometimes you want a custom map where your graphics actually adjust to a certain spot of the map (let's say, the center), rather then being all stuck at the top-left. Manually moving everything one at a time takes forever, and you don't want to have to readjust everything. This problem isn't only limited to expanding/shrinking maps, but when you already know the perfect size for your map, but simply had everything in the wrong spot.
To move every graphic (everything, including platforms, monsters, jump hints, monster links, etc.), click on the Map Move button under Options. This will give you two boxes, an X and a Y. X means width (horizontal), while Y means height (vertical). Type in a positive number, such as 100 to move all of your graphics down/right. Type in a negative number, such as -100 to move all your graphics up/left. Then press OK to actually see everything move.
After moving around the graphics, you want to make sure that everything is okay and working fine. Some jump hints or monster links may not work after you move, so double-check to see if there are any red ones. You also want to check the portal properties, and make sure that the portal (if it links to another portal within the same map) sends you to the right coordinates on the map.
You may also want to save the map before offsetting, and record in a notepad somewhere about how much you moved the graphics in a particular direction. This way, you can undo any changes (by simply typing -100 to undo a 100 change, or 100 to undo a -100 change) that you've done by accident (the x and y boxes won't keep your current offset value stored).
Copying an Existing Custom Map into a New Map
I want to make another custom map like the one I just did, but I don't want to start from scratch. Can I copy my old custom map to my new one somehow?
Yes, you can copy your old custom map to a new one. But don't create the new map just yet.
In order to copy your existing map over to your new map, you have to load your old custom map (the one you want to copy) first. Then, change the name of your custom map in the File text box to the name of new map you want to make. Then hit Save. This will create a duplicate of your custom map, under a different name, if you go back to your list (to go back to your list of custom maps, leave the File text box blank, then hit Load).
Note that you can't copy a friend's custom map to use as your template custom map. Since all custom maps are private and personal (the map designs of a person belong exclusively to them, and it is up to them if they want to share their idea to others), the closest thing you could do is have your friend share information about how they made their custom map instead.
Finding the Middle Ground in Platform Layers
My custom map has two platforms; one at the top and one at the bottom. The platforms are pretty close to each other. I placed a bunch of trees in the foreground at the top platform, but whenever my character walks in the bottom platform, they end up sticking their head behind the stems of the trees (from the top platform). I don't want this to happen. Can it be fixed? (Problem 1)
It can be fixed. However, you need a rough idea of the platform conditions and layers to better understand what's happening here.
Because the background always would stay in the back like it should, and a foreground to stay in the front, we were never introduced to a concept where we needed to know when those layers have to be which at a certain point. Say if you had a desk placed in the foreground, and you want your character to go behind it. The character knows how to go behind the desk, but now it doesn't know how to go in front of the desk (Problem 2). The first problem described above is also one of many examples.
How do we solve Problem 1? This can be solved in two simple steps.
- 1. Delete the trees, and instead of placing them on the Foreground layer, you place them on the Platform layer (make sure Platform layer is selected).
- 2. Turn on the top platform's condition 4: On Background Layer. To turn it on, select your platform, and click Advanced. Then, click on that condition until it is highlighted in white text instead of being grayed out, then click All. That will set your entire platform to be on the background layer. The checkbox called in BG only affects part of the platform, so don't use that.
How do we solve Problem 2? This can be solved similarly to the first problem.
- 1. Delete the desk, and this time place it on the Platform layer.
- 2. Create a second platform, one that will make the character go behind the desk. This should be placed a little bit higher than your first platform (so that you can use jump to go behind or go in front; may need a jump hint if you want to jump directly down instead of from the side).
- 3. Set the second platform's condition to be On Background Layer (don't forget to do it the Advanced > click on condition > All way).
You might be thinking, if we're putting everything that was on the Foreground onto the Platform layer now, then when do we use the Foreground layer? We can still use it for creating effects on the custom map closest to the audience (shadowy bookcase to indicate that there is a bookcase on the other side of the room). With complex platforms (platforms with more than 2 nodes), you might want to create a grassy place where the grass only comes in thick at the last section of a single platform. You can then use Foreground to create thin grass (lead-in) on the middle section, so that when your character moves into the last section, your character is covered up completely by thicker grass (last section of the platform in the background layer, while the grass graphics are in the platform layer).
Adding Distant Objects in Background Mode
I'm tired of being confined to the same layers for backgrounds for my custom maps. Is there any way to make the background more appealing, without having to upload custom backgrounds?
According to the map editor, there are a total of 7 known in-game layers (ordered from back [1] to front [6]): three distant backgrounds (DBG) known as Layer 1, Layer 2 and Layer 3, before eventually moving onto background (L4), platform (L5) and foreground (L6). These DBG layers are stretched out to the entire map and are rendered in parallax, creating the illusion of depth. Normally, these layers are reserved for background images and the sky by default, but we can actually insert distant objects on them!
To create a distant object, stay in Background mode and select Layer 2 or 3, then place your objects on the map as usual. However, we can't actually see how the object will mesh with the background, so keep the object selected and temporarily toggle Background mode off in order to return to Normal mode (do not click anywhere on the field or you'll unselect the object). Use the mini-map and on-screen scroll keys to see how the object moves in parallax, then adjust it's position with your keyboard's arrow keys.
You can recolor distant objects by selecting them while in Background mode on that specific layer, then exiting Background mode to return to Normal mode. While the object is still selected, change the values on the Hue/Bri/Des boxes. You can also resize distant objects before setting it down on the layer.
Keep in mind a few things while operating in and out of Background mode:
- In Background mode, the only layer shown to us is the layer that we selected (e.g. Layer 1). All other layers, including the bg/platform/fg are hidden.
- Background images in Background mode are shown in their original size, prior to being stretched to fill the entire map. As soon as we leave the mode, the editor re-stretches the image again.
- You can't interact with the default sky image, but you can replace it by setting a new background in Layer 1. Certain background images can overlap with other ones in Layer 1, but need to be placed in Layer 2, leaving your distant objects in Layer 3.
- Setting a new background image will wipe out existing distant objects placed on that layer. It is recommended that you keep your distant objects on a separate layer from your background images.
- You can only interact with distant objects if you are in Background mode and in the specific layer you chose to place them in. Otherwise you won't be able to select them.
Visiting the Custom Map
After doing a thorough inspection of your custom map, you still want to visit the custom map you've created for any bugs in your map that are still around. If any graphic objects are slightly out of place, or was layered incorrectly, you can go back to the map editor and correct it. Same goes for platforms, jump hints, portals, monster placements, etc.
To visit the custom map, go to one of the village mayors (Alyshia in Saliko Village or Benjamin in Ashaya Village), or Roc in Argan Village. Click on I was told a secret code .."
If you've created any custom maps, you should see a list of the custom maps you've created under their file name (not their map name!). Underneath this list is a text box you can use to access another player's custom map, if you have the code. Click on one of of your custom maps to be redirected to the code screen, with a code automatically filled in. This is a temporary code that always changes, only giving access for a short while (the code will still be valid until after every player has left the map). Accept it to go into your custom map.
To get the permanent version of the code, you must go to the Dashboard and click on a custom map. Then, click on Enable guest access to open a few more options. Click on Code, and it should open a pop-up displaying the permanent code. You should write it down somewhere, such as a notepad for easier access. Note that if you disable guest access, the permanent code becomes invalid. Re-enabling it will give you a new permanent code.
To leave the custom map, use the command /return. If the custom map's creator did not set a respawn point, then it will take you back outside upon being knocked out.
Limitations, Delays and Best Practices
- Uncheck Use Cache, then exit, wait a couple of minutes, then re-enter if the custom map is not properly updating after waiting for some time.
- The server can only upload so much of your file at once. You'll have to wait somewhere between several minutes (the page on Map Editing suggests at least five minutes) to several hours for the custom map to properly implement platforms (that had their conditions changed), jump hints, portals, respawn points and monsters.
- Graphics and map sizes usually change immediately once you leave and re-enter, along with normal platforms. Stuff that requires logic/coordinate-based computation, such as advanced platforms, jump hints, portals, respawn points, monster spawns/properties take longer.
- Only add jump hints after you are sure about your position placements for your platforms. If you happen to move the platforms connected to jump hints, the jump hints will successfully be loaded to the server, but once in-game, they won't work.
- There is a maximum of 50 platforms and jump hints that you can place onto a map. Portals have a limit of 8, while respawn points have a limit of 1.
- You cannot set a monster's respawn time to be near-instant (e.g. 1 second). There is a minimum respawn time of 20 seconds.
- The furthest that you can push a map horizontally is somewhere between 2,888 to 2,890 pixels before any graphic objects placed will be cut off by the server. The version of the custom map that you see in the map editor is not accurately reflected in-game when it comes to map boundaries, and is offset by a certain number of pixels. Platforms will still continue to work beyond this range.
Summary
- First, choose a size and file name for your custom map.
- Set a background to your custom map (if you are not happy with the default).
- Add graphic objects (part of the background, platforms, scenery and sounds).
- Fix the layers of the graphic objects.
- Create platforms, jump hints and a respawn point (so you can walk in the custom map).
- Revise jump hints and platforms so that they work.
- Add and configure portals to connect your custom maps together.
- Bring monsters into your custom map.
- Configure the monster's settings.
- Finally, choose a proper name for your custom map (and don't forget to save).
Thank you for reading this tutorial. Most of the information gathered has been to my experience of using the map editor, asking questions and using the wiki pages as a reference.
Written by localguest.


