Difference between revisions of "Template:MidnightMountain"
Localguest (talk | contribs) m |
Localguest (talk | contribs) m |
||
| Line 1: | Line 1: | ||
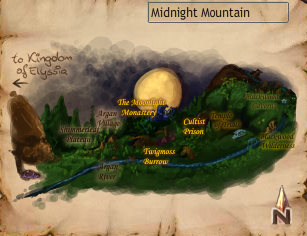
<!-- Overlay image of Midnight Mountain's World Map (Argan Jungle & Blackwood). Template is as follows: TemplateName, X, Y, Map Name, Icon Override, Icon Size Override, Style --> | <!-- Overlay image of Midnight Mountain's World Map (Argan Jungle & Blackwood). Template is as follows: TemplateName, X, Y, Map Name, Icon Override, Icon Size Override, Style --> | ||
<div style="position:relative;display:inline-block;">[[File:MidnightMountainWorldMap.png|600px|link=]] | <div style="position:relative;display:inline-block;">[[File:MidnightMountainWorldMap.png|600px|link=]] | ||
| + | <!-- ~~~ Cave to Midnight Mountain ~~~ --> | ||
| + | {{WorldMapNode|45|331|Cave of Darkness}} | ||
| + | <!-- {{m|44|274|Cave to Midnight Mountain II}} --> | ||
| + | {{WorldMapNode|44|274|Cave to Midnight Mountain II}} | ||
| + | {{WorldMapNode|73|265|Deep inside Midnight Mountain}} | ||
| + | <!-- {{m|44|274|Cave to Midnight Mountain II}} --> | ||
| + | <!-- ~~~ Western Argan Jungle ~~~ --> | ||
| + | {{WorldMapNode|96|303|The Cave to Elyssia}} | ||
| + | {{WorldMapNode|123|296|Eastern Jungle}} | ||
| + | {{WorldMapNode|147|295|Eastern Jungle II}} | ||
| + | {{WorldMapNode|130|277|An Underground Tunnel}} | ||
| + | {{WorldMapNode|114|276|Jungle Crypt}} | ||
| + | <!-- {{m|147|295|Eastern Jungle II}} --> | ||
| + | {{WorldMapNode|176|289|Eastern Jungle III}} | ||
| + | {{WorldMapNode|215|297|Argan River}} | ||
| + | {{WorldMapNode|244|296|Argan River II}} | ||
| + | <!-- {{m|176|289|Eastern Jungle III}} --> | ||
| + | {{VillageNode|209|267|Argan Village}} | ||
| + | <!-- ~~~ Central/Eastern Argan Jungle ~~~ --> | ||
| + | {{WorldMapNode|234|266|Argan Jungle II}} | ||
| + | {{WorldMapNode|265|262|Deep Argan Jungle}} | ||
| + | {{SkullNode|277|280|Twigmoss Burrow}} | ||
| + | <!-- {{m|265|262|Deep Argan Jungle}} --> | ||
| + | {{WorldMapNode|278|234|The Moonlight Monastery}} | ||
| + | {{SkullNode|296|225|Moonlight Monastery}} | ||
| + | <!-- {{m|265|262|Deep Argan Jungle}} --> | ||
| + | {{WorldMapNode|306|253|The Cultist Village}} | ||
| + | {{WorldMapNode|329|269|Cultist Storage}} | ||
| + | <!-- {{m|306|253|The Cultist Village}} --> | ||
| + | {{WorldMapNode|355|249|Lower Plateau}} | ||
| + | {{SkullNode|356.5|291|The Tunnels of Illusion}} | ||
| + | <!-- {{m|355|249|Lower Plateau}} --> | ||
| + | {{WorldMapNode|376|233|Deep Argan Jungle (2)}} | ||
| + | {{SkullNode|388|229|Cultist Prison}} | ||
| + | <!-- {{m|355|249|Lower Plateau}} --> | ||
| + | {{WorldMapNode|438|256|Forest of Illusion}} | ||
| + | {{WorldMapNode|429|269|Cavern of Illusion}} | ||
| + | {{WorldMapNode|480|269|Timeless Waters}} | ||
| + | <!-- {{m|438|256|Forest of Illusion}} --> | ||
| + | {{WorldMapNode|466|262.5|The Bat Rider Camp}} | ||
| + | <!-- {{m|438|256|Forest of Illusion}} --> | ||
| + | {{WorldMapNode|463.5|251.75|Temple of Trials}} | ||
| + | {{WorldMapNode|477|243|The Great Abyss}} | ||
| + | <!-- ~~~ Lower Blackwood ~~~ --> | ||
| + | {{WorldMapNode|494|231|Lower Wilderness}} | ||
| + | {{SkullNode|481|229|The Silt Cave}} | ||
| + | <!-- {{m|494|231|Lower Wilderness}} --> | ||
| + | {{WorldMapNode|523.25|236.75|Blackwood Hive}} | ||
| + | {{WorldMapNode|545|191|Moonlight Well}} | ||
| + | {{WorldMapNode|565|186|Deep Blackwood Jungle}} | ||
| + | <!-- {{m|480|381|Maintenance Access Shaft}} --> | ||
| + | {{SkullNode|480|381|Maintenance Access Shaft}} | ||
| + | <!-- {{m|494|231|Lower Wilderness}} --> | ||
| + | {{WorldMapNode|519|213|Lower Wilderness II}} | ||
| + | <!-- {{d|545|191|Moonlight Well}} --> | ||
| + | <!-- {{m|519|213|Lower Wilderness II}} --> | ||
| + | <!-- ~~~ Blackwood Caverns ~ Depths Entrance ~~~ --> | ||
| + | {{VillageNode|512|178|Blackwood Caverns}} | ||
| + | {{VillageNode|509|161|Blackwood Caverns - Player Rooms}} | ||
| + | <!-- {{m|512|178|Blackwood Caverns}} --> | ||
| + | {{VillageNode|522|171|Blackwood Caverns - Room 6}} | ||
| + | {{VillageNode|529|180.5|Blackwood Caverns - Laurel's Room}} | ||
| + | <!-- {{m|454|352|Main Tunnel Entrance}} --> | ||
| + | {{SkullNode|454|352|Main Tunnel Entrance}} | ||
| + | {{SkullNode|467|353|The Blackwood Depths}} | ||
| + | <!-- ~~~ Blackwood River ~~~ --> | ||
| + | <!-- {{m|512|178|Blackwood Caverns}} --> | ||
| + | {{WorldMapNode|545|168|Blackwood Wilderness (East)}} | ||
| + | {{WorldMapNode|556|168|Blackwood River}} | ||
| + | {{WorldMapNode|561.5|168|Blackwood River Cave}} | ||
| + | <!-- ~~~ Upper Blackwood ~~~ --> | ||
| + | <!-- {{m|512|178|Blackwood Caverns}} --> | ||
| + | {{WorldMapNode|476|176|Blackwood Wilderness}} | ||
| + | {{WorldMapNode|458|196|Blackwood Wilderness II}} | ||
| + | {{WorldMapNode|447|207|Above the Great Abyss}} | ||
| + | <!-- {{m|476|176|Blackwood Wilderness}} --> | ||
| + | {{WorldMapNode|472|152|Upper Blackwood Wilderness}} | ||
| + | {{WorldMapNode|491|166|Midnight Mountain (Carolyn's Hole)}} | ||
| + | <!-- {{d|512|178|Blackwood Caverns}} --> | ||
| + | <!-- {{m|472|152|Upper Blackwood Wilderness}} --> | ||
| + | {{WorldMapNode|481.5|148|Upper Blackwood Wilderness II}} | ||
| + | {{WorldMapNode|498|144|Blackwood Blast Mine}} | ||
| + | <!-- {{m|472|152|Upper Blackwood Wilderness}} --> | ||
| + | {{WorldMapNode|455|159|High Above the Great Abyss}} | ||
| + | {{WorldMapNode|426|158|The Emerald Springs}} | ||
| + | {{WorldMapNode|410|160|Blackwood Canopies}} | ||
<noinclude>[[Category: Templates]]</noinclude> | <noinclude>[[Category: Templates]]</noinclude> | ||
Revision as of 07:27, 12 December 2024